
Piston check valves are essential for controlling fluid flow in various industrial applications. They belong to the check valve family, which permits only unidirectional flow in a system. In this article, we explore the piston check valve’s operation, how to install it, and how it compares to other types of check valves.
Piston Check Valve Operation
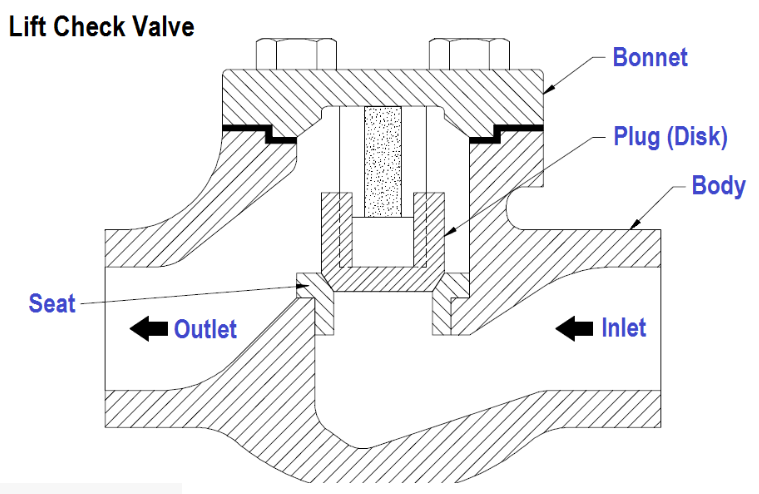
A piston, or lift, check valve is a type of check valve in which a piston is the valve disc for controlling fluid flow. Before delving into its operation, it is important to review its components using a typical diagram.
Piston Check Valve Diagram
Like other check valves, a piston check valve has a mechanism to keep the disc in the seating position. This is usually a spring, but it could be any other mechanism that provides a force contrary to fluid flow. One key attribute of piston check valves is a guide, which prevents misalignment of the piston as it opens and closes. The following diagram highlights the basic components of a piston check valve.

How Does a Piston Check Valve Work?
This section reviews the operation of a piston check valve when in forward flow, no or low flow, and reverse flow.
Forward Flow
When fluid flows in the desired direction, it exerts pressure to lift the piston off its seat. After attaining a threshold pressure, the fluid overcomes the resistance from the spring and gravity, hence lifting the piston. The particular pressure at which lifting occurs depends on design parameters like the spring stiffness and weight of the piston. Once lifting occurs, the fluid flows through the valve with minimal resistance.
Low or No Flow
If the pressure on the piston decreases or stops, the gravity and spring force move the piston to close the valve gradually. This will occur until the piston rests entirely on the seat to stop the flow completely.
Reverse Flow
The valve design is such that if there is an attempt at reverse flow, the back pressure pushes the piston firmly onto the seat. As a result, backflow is not possible. This protects the upstream components from potential damage and prevents contamination from backflow.
Piston Check Valve Installation
Proper piston check valve installation is essential for optimal performance and longevity. Here is a step-by-step guide based on industry best practices for installing a piston check valve.
Shut Down the System
Ensure the system is depressurized and drained. Follow appropriate lockout/tagout procedures to prevent accidental operation during installation.
Preparation
- Inspection: Inspect the valve and piping before installation for damage or debris. Ensure the valve is the correct type and size for the application.
- Clean the Pipeline: Clean the pipeline to remove any dirt, debris, or foreign materials that could affect the valve’s operation.
- Check Flow Direction: Verify the flow direction marking on the valve body. Because piston check valves are unidirectional, they must be in the correct orientation to function properly.
Install the Valve
- Positioning: Position the valve between the pipeline flanges, ensuring it is aligned with the flow direction. The valve installation can be horizontal or vertical, according to the manufacturer’s specifications.
- Gasket Installation: Place the appropriate gaskets between the valve and pipeline flanges. Ensure the gaskets’ correct alignment to prevent leakage.
- Bolt Tightening: Insert the flange bolts and tighten them evenly using a star pattern to ensure uniform gasket compression. Use a torque wrench to apply the torque according to the manufacturer’s specifications.
Post Installation
- Alignment: Ensure the valve and pipeline are adequately aligned. Misalignment can cause stress on the valve and piping, leading to potential leaks or damage.
- Piping Support: Provide adequate support for the valve and piping to prevent undue stress on the valve body. Use hangers, supports, or brackets as per requirements.
- Final Inspection: Perform a final inspection to ensure all bolts are tight and have the correct valve orientation.
System Restart
- Gradual Pressurization: Slowly pressurize the system to check for leaks. Gradually increase the pressure while monitoring the valve and surrounding piping for any signs of leakage.
- Operational Check: Test the valve operation by introducing flow to verify that the piston lifts and seals correctly. Observe the valve during normal operation to ensure it functions as expected.
Piston Check Valve vs Swing Check Valve
| Feature | Piston Check Valve | Swing Check Valve |
| Sealing Design | Utilizes a piston that moves linearly to open or close the valve. Moreover, the valve seat is either flat or conical. | The disc swings about a pivot to open or close the valve. The valve seat could be flat or angled. |
| Response | Generally quicker due to the piston’s weight and spring assistance. | Slower because of swinging motion. |
| Sock and Vibration | Less susceptible to water hammer. | Closing action makes it more susceptible to water hammer. |
| Shutoff | Delivers a tighter seal because of the large surface area of piston and seat. | Offers less flow resistance, making it less than ideal for high-pressure applications. |
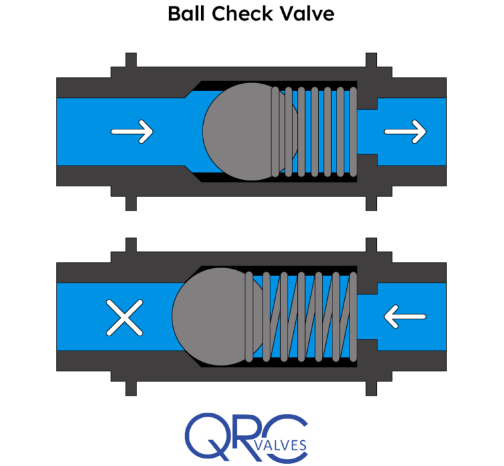
Piston Check Valve vs Ball Check Valve
| Feature | Piston Check Valves | Ball Check Valves |
| Sealing Design | Utilizes a piston to close or open the valve. | A ball moving within a chamber closes or opens the valve. |
| Installation Orientation | Flow can be horizontal or vertical. | Whereas flow can be in any direction. |
| Maintenance | Requires precise alignment for optimal performance. | Fewer moving parts for easier maintenance. |
| Application | Ideal for high-pressure applications due to its higher resistance and robust sealing. However, it is more expensive. | Ball check valves have higher resistance than swing check valves, but still lower vs piston check valves. Simpler design means it comes at a lower cost. |
Recent Comments